Timeline
From our experience over the years we've come to realise that animation code can
quickly become quite complex and difficult to maintain as a project evolves, no
matter what library you use. This is one of the reasons why we wrote looop.js
and it's accompanying Timeline UI.
The goal is to be as simple as possible to use, and not interfere / make a mess of your code base.
You can customise your animations by editing the timeline.config.json file
directly, but as things grow that will become quite tedious quite quickly, so we
recommend using the Timeline UI.

Multi-track loops
A video may help explain this better, but here's a few words for now...
Each track is independent, meaning it can have it's own duration (and delay). Each track will then be repeated until all the tracks hit a common loop point, at which time the animation will jump back to the beginning. You can see this visualised in the Timeline UI.
Every time a track is repeated or when it loops back to the beginning, the last keyframe will tween to the first keyframe, creating a seamless loop. Magic!? No, unfortunately not, but pretty cool!
The Timeline UI
Still work in progress, the Timeline UI is a way to visualise and edit the
timeline.config.json. The main features are there, but for now you will need
to edit some of the parameters (duration, delay, easing) directly within the
config.
The data within the config is then passed into the animation library -
looop.js
looop.js
To use the Timeline UI you'll need to import looop.js and save a copy of the
instance on the window object.
import { TimelineLoop } from 'https://cdn.skypack.dev/looop.js';window.timeline = new TimelineLoop();
You then pass in the data from the timeline.config.json file
import { TimelineLoop } from 'https://cdn.skypack.dev/looop.js';import tracksConfig from './timeline.config.json';window.timeline = new TimelineLoop();tracksConfig.forEach((track) => {window.timeline.addTrack(track);});
Finally you assign an onUpdate method to the timeline object. The onUpdate
method then gets called on every requestAnimationFrame by looop.js when the
timeline is playing.
...window.timeline.onUpdate = (timelineData) => {// update stuff!};
A bunch of data is then made available for you within the onUpdate function
from looop.js which you can then use in your code to update your animation:
tracks
This is a copy of the array from the timeline.config.json that's been
converted into an object for ease of use. Each key in the object corresponds
to the id that was specified for the track. Also, (and most importantly!) is
the value property. This is the tweened value at that moment in time on the
timeline. You can access this in your code like so:
timelineData.someTrackId.value;
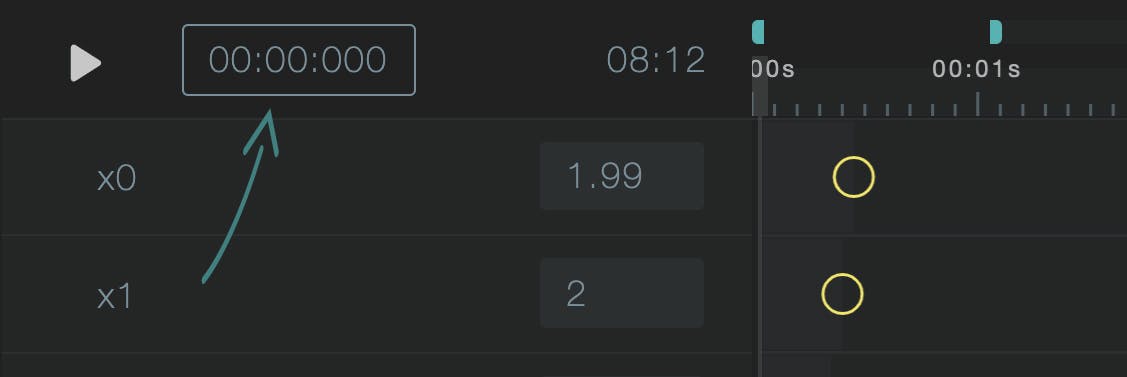
currentLoopTime
This is the current time (in seconds). It will start from zero again when it reaches the end of the loop. It's also displayed here in the UI (MM:SS:MS):
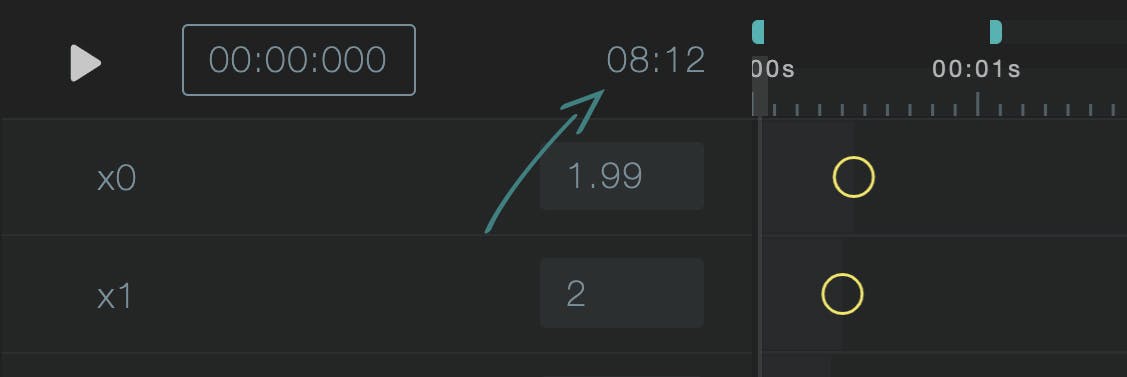
totalLoopTime
This is the point in time where all tracks have a common loop point. It is displayed here in the UI (MM:SS):
Note: The totalLoopTime can easily get quite large depending on the
duration set for each track. If you want to keep the totalLoopTime as low as
possible, ensure the duration of each track are multiples of each other, or have
common multiples. e.g
[{"duration": 3},{"duration": 5}]// `totalLoopTime` (common multiple) is 15
[{"duration": 5},{"duration": 9}]// `totalLoopTime` (common multiple) is 45
completeLoopCount
This number increments by one each time the timeline loops back to the beginning.
You can easily calculate totalElapsed time like so:
const totalElapsedTime = currentLoopTime * completeLoopCount;
Now don't worry about remembering all this, as you can simply fork an existing project, or use one of the templates. Here's a simple example project to get you started.
timeline.config.json
As mentioned before, we're working on the Timeline UI so you can easily update
the configuration without needing to touch this file, but for now you will need
to for the id, duration, delay and ease values.
Here's a list of all the possible track values and what they mean:
id: string
A unique identifier that is used to reference the tweened (animated) value.
duration: number (seconds)
The duration in seconds for that track
delay: number (fraction of the duration)
If defined, the delay will offset the track by a fraction of the duration, e.g
if duration = 5 and delay = 0.5 then the offset would be 2.5 seconds.
We use a fraction for this and not seconds as it makes life a little easier. If you update the duration then you shouldn't need to update the delay, as the calculated value will be derived from the duration.
ease: string (expoInOut | quadInOut)
The easing function that will be applied to each keyframe. There's just 2 options at the moment, but we're adding more soon, as well as the ability to generate your own for individual keyframes.
segments: Array<{ position: number, value: number }>
Each item in the array corresponds to a keyframe.
position: number (fraction)
This is where the keyframe will be positioned on the track. Again, this is a
fraction of the duration which means you don't need to update it when you change
the duration. e.g if duration = 5 and position = 0.5 then the keyframe will
be positioned at 2.5 seconds on the track.
value: number
This is the value that will get tweened between each keyframe. This number can
be anything you like, but we do recommend (again 😬) making it a fraction e.g a
value between 0 and 1. You can then map that easily to any set of numbers you
like within your code, which means you have more control and can quickly tweak
the numbers within your current file rather than jumping to the config or the
Timeline UI.
We export the handy map function from looop.js:
import { map } from 'https://cdn.skypack.dev/looop.js';const inputValue = track.x.value;const inputMin = 0;const inputMax = 1;const outputMin = -10;const outputMax = -10;const newValue = map(inputValue, inputMin, inputMax, outputMin, outputMax);
So this will essentially convert 0 to -10 and 1 to 10.